
We will use the Transport demo project to demonstrate how to build a Sapelli XML decision tree in this tutorial.
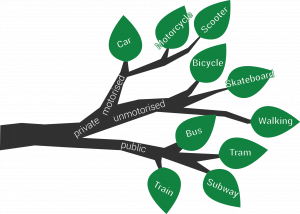
As illustrated on the left, a decision tree is a ‘tree’ structure in which each ‘branch’ represents a choice between a number of alternatives. Here, each ‘leaf’ represents the user’s final choice. Through such decision trees Sapelli is able to collate pertinent data.
Before building a decision tree as an XML file, you should already have designed a well thought-out, practical decision tree. Keep in mind the purpose of your project as well as the users’ perspective when creating your ‘choices’. Try not to clutter your decision tree with too many choices in each layer of the tree, as this will not show up well in the app. Finally, make sure each choice is clear and self-explanatory.
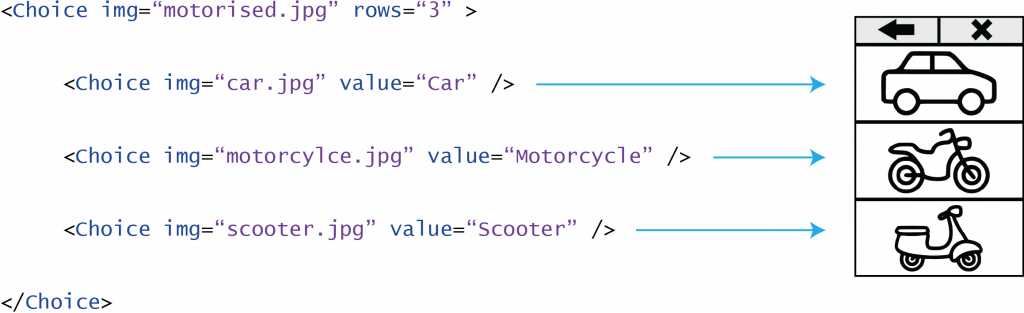
The Transport demo uses images to display choices to the user. The picture below displays one choice set “motorised.jpg” which contains three rows (three choices for the user). For each choice, the XML describes the image that will be displayed in the app “car.jpg” as well as the value that will be recorded for that choice “Car”.
The image below demonstrates how the above choice set is nested within elements to become part of a decision tree. The first and outer-most choice is the “root”. It contains the id, which will also be the title for any data collected within this decision tree. In this example, the Choice ID is called “TransportMode”.
Every choice element defines the layout information for the consecutive screen. In this example, the first screen presented to the user will be displayed as one column (cols=”1″) and two rows (rows=”2″) on the android screen (the screen on the far left of the image).
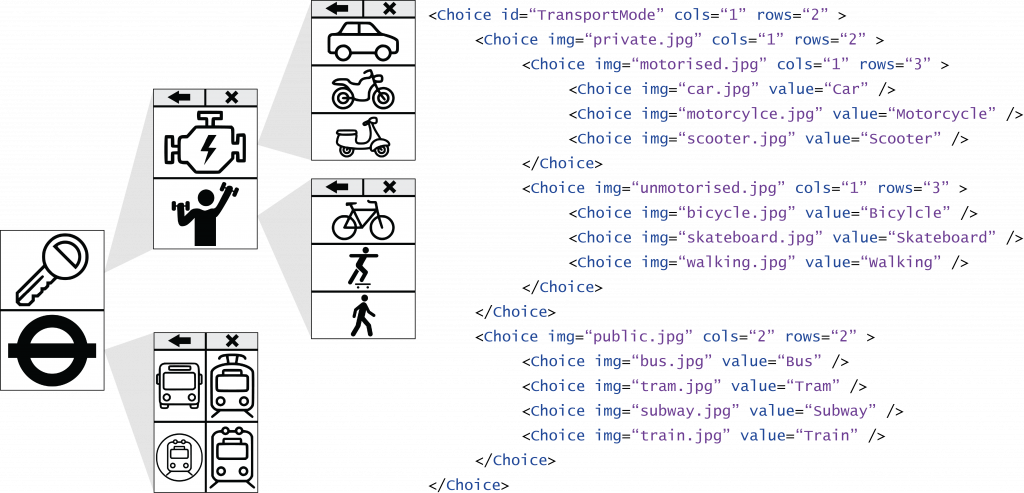
The first screen that the user sees corresponds to the choice elements nested directly within the “root” choice. It consists of two choice fields, the first one showing the image “private.jpg” and the second one showing the image “public.jpg”. If we go one level deeper following the route of the first choice will lead to a screen with the two choices “motorised.jpg” and “unmotorised.jpg”. Each of which contains three further choices themselves. Following this logic you can create your own Sapelli XML decision tree with as much depth as you wish. Your choices don’t need to be represented by images. If you prefer to have text instead of an image to represent your choice, then you can use the following tag:
|
1 |
<Choice caption="text you wish to display" /> |
Remember to close your tags after each choice set like this </Choice>. When you have finished your XML document, an easy way to check that it does not contain any errors is to open the file in internet explorer. If the file does not open, then it is likely that there is an error in the XML document – such as an un-closed tag.
If you think of a table structure, like an Excel spreadsheet, one decision tree produces a data output equal to one column with a title (in this case TransportMode). The rows within that column are equal to the chosen values (e.g. Car, Motorcycle, etc.).
All possible attributes you can use to fine-tune your decision tree according to your needs can be found here. If you want your project to go beyond the decision tree structure, then you can add additional functionalities to the Sapelli XML which will allow you to collect other forms of data. For example, you can provide options for the user to capture their GPS location, take pictures, audio or video recordings.